How to Register a Binance Account in 2026
If you’ve finally decided to stop watching the crypto space from the sidelines and want to actually get your feet wet into this space. Congratulations, that’s a smart move. And Binance is one of the best crypto exchange platforms where you can set up shop.
Good thing is, creating an account on Binance takes you less than 10 minutes. But you want to do it carefully so that you don’t miss out on bonuses, or setup yourself up with security issues. This detailed guide will walk you through the steps required to register your account up to the point of you making your first trade.
Let’s dive into it.
Before You Start: What You’ll Need
Before you begin the registration process, make sure you have these ready before you open your Binance account.
- A valid email address- (this is where all your Binance alerts will go)
- A valid & working phone number for SMS verification
- A govt-issued ID- like passport, National ID card or even driver’s license for KYC purposes (know your customer)
- A Binance referral code- (BONUS369) is an exclusive Binance referral code that rewards new users with $600 welcome bonus and a 20% lifetime discount.
- A good internet connection- sounds quite obvious but you don’t want to begin your KYC on unstable internet.
Something worth mentioning upfront: Binance as an entity operates differently in different jurisdictions. US users are required to use Binance.US which essentially is a separate platform with its own registration process and a more limited product catalogue. This guide only covers the global Binance.com platform.
Step 1: Go to the Official Binance Website
While this may sound basic, there are plenty of phishing attacks that often target crypto users. Fraudulent websites designed to steal your login credentials are far too common and they tend to look almost identical to the official Binance website.
Ensure you navigate to: (https://www.binance.com)
Additionally, bookmark the official site instantly so that you never have to google it again. Having to click through search results every time you want to login exposes you to phishing risks enough.
Binance comes with an anti-phishing feature where you have the ability to set a custom code that appears in every legitimate email Binance sends you. So, if an email claims to be from Binance but doesn’t include the personal anti-phishing code, it’s fake. You can set this up once you’ve created your account & it only takes you less than 2 minutes.
Step 2: Click “Register” and Choose Your Sign-Up Method
In order to automatically make use of the Binance referral code (BONUS369) with $600 welcome you can use this Binance referral link>>
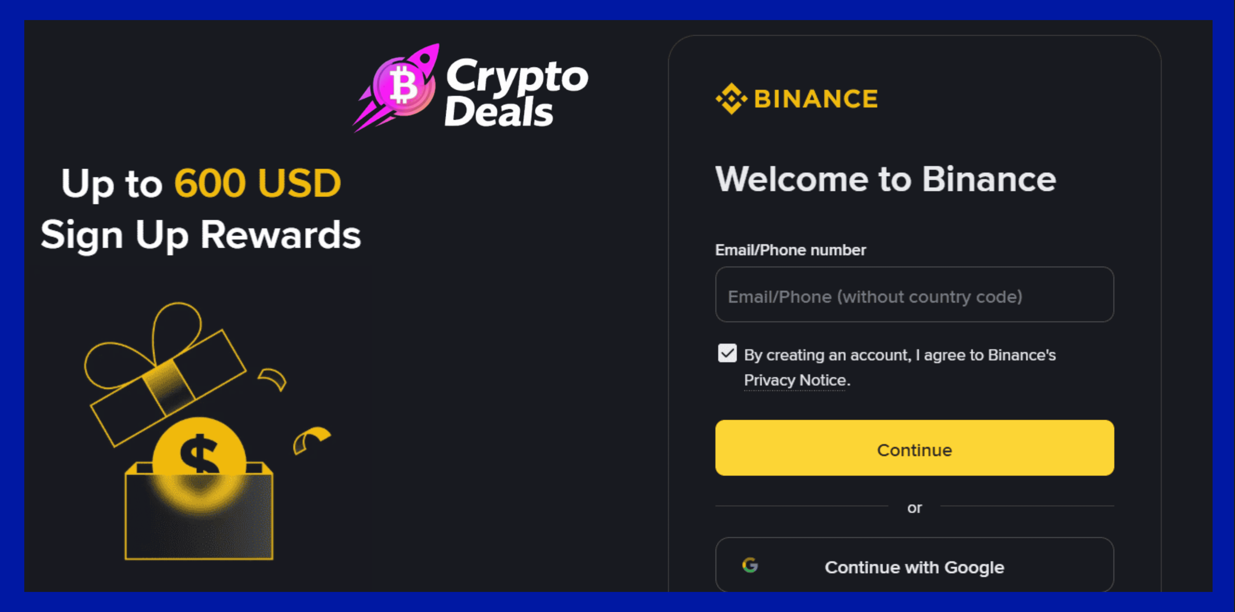
Once you’ve landed on the Binance homepage, proceed to enter your your email
You’ll spot two sign-up options:
- Email address
- Phone number
Each of these do work, but any experienced crypto users understands that email should be the more ideal registration method. It essentially gives you a paper trail, is reliable across many regions and is generally easier to manage for situations like account recovery.
If you go with email, use a dedicated email address for all your crypto accounts. Segregating your crypto activity from the rest of your personal online life is if anything good security hygiene.
Step 3: Create a Strong Password
Binance will then require you to set up your password. This is not the place to put your old recycled password you set up in 2015 for your Facebook account.
Any good Binance account should:
- Have at least 8 characters (Binance requires this minimum, but aim for 12+)
- Make use of uppercase and lowercase letters, numbers, and special characters
- Be incredibly unique- not used on any other platform
The best approach is essentially using a password manager like Bitwarden, 1Password, or similar. These tools will generate and store accurate random passwords so that you never have to remember them or even reuse them. So if your password is for example something like “Crypto2026″ …you’re doing it wrong.
Step 4: Enter Referral Code BONUS369
This is quite an easy step to miss, and if you’re in a hurry, you’ll lose out on this opportunity permanently.
On the registration page, there’s a special field that’s labeled, “Referral ID (optional)” or something similar. This is where you’ll type in: the Binance invite code BONUS369. (If you had used the Binance referral link, it will automatically display here)
Here are the perks you’ll get for using it:
- Up to $600 USDT in welcome bonuses (distributed in form of task completion)
- 20% lifetime discount on all trading fees for a lifetime.
This fee discount by itself is worth thousands of dollars over the lifetime of your trading activity. There’s absolutely no reason to not make use of it
Important reminder: A Binance referral code cannot be used once you’ve fully registered your account. There is completely no way to apply it to an existing account. You have to enter it during registration.
Binance referral ID with boosted welcome bonus
Step 5: Verify Your Email (or Phone)
Once you’ve filled your details, and clicked on the registration button, Binance will then send you a 6-didit verification code to your email/phone, depending on which one you registered with. Check your email inbox for it, and if you don’t spot it there, check the spam folder. Go on to enter the code.
This code expires in a few minutes, so in case you wander off, you can always request for a new one.
Andrzej Wiśniewski Quick Tip

Andrzej Wiśniewski is a Kraków-based crypto trader and on-chain analyst who’s been active in the space since the 2017 bull cycle.
Often times, people tend to rush through the Binance registration. That five mins you spend now on selecting a good password, picking the right email, and entering a good referral code are decisions that will affect your Binance account for years. I’ve come across traders who lost access to accounts worth six figures since they used a throwaway email they stopped checking, or got phished because they bookmarked a fake Binance site. Registration is the foundation. Take all the time you need.”
Step 6: Complete KYC Verification (Identity Verification)
Here’s where a lot of Binance beginners tend to delay. KYC (Know Your Customer), is the identity verification process that Binance (and every regulated exchange) requires in order to abide by regulations. This is entirely the reason you need that government ID ready.
If you don’t complete KYC, your account is incredibly limited:
- Lower or zero withdrawal limits
- No access to many of Binance’s products
- No eligibility for the welcome bonus tasks
- Restrictions on P2P trading and fiat on-ramps
Why does Binance do KYC? The answer is simple. Regulatory compliance. Financial regulators globally require exchanges to verify user identities so as to prevent money laundering, fraud, and other financial crimes.
How to Complete KYC on Binance:
- Go to your profile icon & click on Identification
- Choose your country of residence
- Choose your type of document (passport is the fastest)
- Upload very clear photos of the front and back of your ideal govt-issued ID.
- Complete the liveness check. As a new Binance user, a liveness check prompt using your devices’ selfie camera will give you a couple of instructions such as (turning your head or blink to confirm you’re a real person.
- Submit and wait
Verification timeline: For most Binance newbies, KYC process completes in just a few minutes to a few hours. Other times, it takes up to 24 hours during high-volume periods. You’ll get an email notification when it’s done.
Binance verification full process
Most times, the reason KYC fails or gets delayed is due to poor photo quality. Ensure to take document photos in good lighting, on a flat surface, and with zero glare on the document surface. All the four corners of the document should be visible. In case you’re using a plastic card ID, you can tilt it a bit to eliminate glare from overhead lights before taking photos.
Step 7: Set Up Two-Factor Authentication (2FA)
Once your account is verified, you need to setup 2FA immediately.
Two-factor authentication adds an extra layer of security after you’ve setup your password. So that in an event, someone obtains your password through a data breach or phishing attack, they still won’t be able to access your account without having your 2FA device.
Binance supports several 2FA methods:
- Google Authenticator / Authy– Generates one-time codes on your phone. This is the gold standard. Make sure to use it.
- SMS verification– Can be convenient but it’s less secure. SIM-swap attacks (where someone convinces your carrier to transfer your number to their SIM) can easily bypass SMS 2FA.
- Passkeys / Hardware keys– The safest option for high-value accounts. Yubikeys and similar hardware security keys are used by top institutional traders.
Ultimately, for retail traders, Google Authenticator or Authy offers the right balance of security and convenience. Set it up, screenshot the backup codes, and store these codes safely.
Step 8: Explore the Rewards Hub and Claim Your Bonuses
Upon verification & securing your Binance account, navigate to the Rewards Hub, and you’ll find all the promos in the profile section of your Binance account.
This is where users can access the welcome bonus. Binance structures the $600 bonus as a group of tasks, and each one unlocks a portion of the total $600 bonus. Some common tasks include:
- Depositing your first crypto– Even a minimal amount qualifies for initial rewards.
- Placing your first spot trade– This is essentially swapping one crypto for another
- Reaching deposit/trading volume thresholds – Larger deposits and more trading tends to activate bigger reward tiers
- Trying out other Binance products– Things like futures trading (do it carefully, if you’re new), Binance Earn, or staking.
Welcome bonuses on Binance do expire. Most come with a 14-30 day window from the date of registration. Go to Rewards Hub within 24 hours of registering to see the particular deadlines. Don’t just assume you have unlimited time to complete them.
Step 9: Make Your First Deposit
Now that you have your active account, fully verified, and 2FA running, it’s now time to fund it. Binance gives you multiple ways to make deposits.
Crypto deposit: If you already hold some crypto on another wallet or exchange, you can easily transfer it directly to your Binance wallet address. Just navigate to Wallet → Fiat and Spot → Deposit, select the type of asset you’re transferring, copy the Binance deposit address, and send from your external wallet.
Critical tip: It’s essential to send a small test transaction before, especially when depositing to a new network address for the first time. Send a tiny amount, confirm that it’s been received, then send the rest. Of importance is to understand that crypto transactions are irreversible, even a simple typo in the address means your funds are gone good.
Fiat deposit (bank transfer/card): Binance supports direct fiat deposits via bank transfer, debit/credit card, and other local payment methods depending on your location. Card deposits show up instantly but may carry a higher fee. Bank transfers tend to be slower but cheaper.
P2P trading: Binance’s peer-to-peer marketplace allows users to buy crypto directly from other users using local payment methods. It’s specifically important in regions where direct fiat deposits have restricted support.
Andrzej Wiśniewski Quick Tip
Andrzej Wiśniewski is a Kraków-based crypto trader and on-chain analyst who’s been active in the space since the 2017 bull cycle.
“Most newbies on Binance almost always make the same mistake when it comes to deposits: they see the card deposit option, select it because it’s instant, but don’t notice the 1.8% fee that comes with it. On a $1,000 deposit, that’s $18 gone before even placed a single trade. The Best Approach: Use bank transfer for anything above $200 (yes, it may take a day or two, but the fee is almost zero). Only use card deposits for very small urgent amounts when you need to catch a fast-moving entry. You should understand your deposit costs the same way you track your trading fees, as they all eat into your returns.”
Understanding Binance’s Account Tiers
Binance uses a VIP tier system that determines a user’s trading fees. And so the more you trade (measured by 30-day trading volume in BTC equivalent), the lower your fees get. Here’s a simple breakdown to showcase this:
| VIP Level | 30-Day Volume | Maker Fee | Taker Fee |
| Regular | < 1 BTC | 0.1% | 0.1% |
| VIP 1 | ≥ 1 BTC | 0.09% | 0.1% |
| VIP 2 | ≥ 5 BTC | 0.08% | 0.1% |
| VIP 3+ | ≥ 20 BTC | 0.07% | 0.1% |
And with the BONUS369 referral code, you also get a 20% discount applied on top of your tier’s base fee rate. So even as a normal user, you’re only paying 0.08% maker fees instead of 0.1%. As you level up through VIP tiers, this 20% discount easily compounds with your lower base rate.
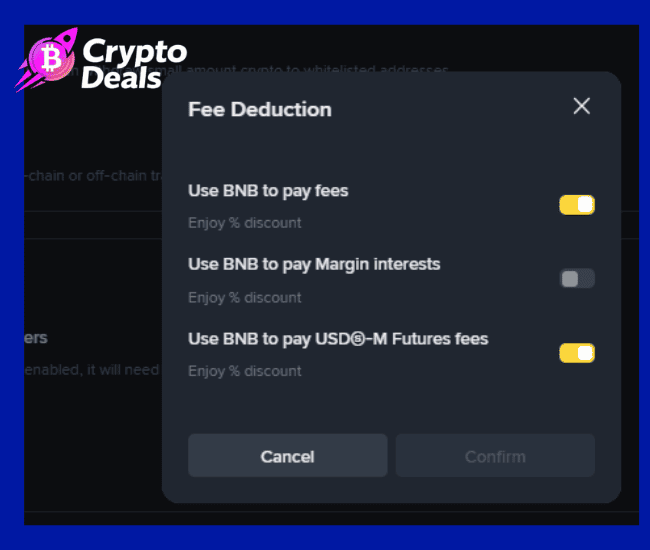
Additionally, hold BNB and enable BNB fee payment. This can be done from your profile under settings> fee deduction > manage . And you’ll be getting some of the most competitive fee rates available on any major exchange.
Navigating the Binance Interface as a New User
Binance’s platform may feel like it’s too much, as a beginner. Here’s a quick map of where things are:
Markets– Here you can browse all available trading pairs and their current prices. It’s a great starting point to see what’s moving.
Trade → Spot– This is your central trading interface. Its classic view shows you the full order book and chart. If it feels too overwhelming, you can switch to the simplified “Lite” mode in the app.
Earn– Binance’s yield product hub. Here, you’ll find flexible savings, locked staking, Launchpad, and more. Best place to put idle stablecoins to work.
Wallet → Overview– You can check out all your balances over spot, earn, funding, and futures accounts. Take note that Binance separates funds between different sub-wallets, if you deposit to your spot wallet, those funds won’t automatically appear in your futures account. On Binance you’ll have your spot wallet, futures wallet, margins wallet, options wallet and funding wallet.
Reminder: Crypto bought using credit card or bank transfer the USDT directly to the spot wallet. Alternatively, if you need to withdraw any crypto, you should transfer the crypto asset from the other wallets to the funding wallet.
Orders → Trade History– This is where you track all your completed and open orders. This is important for tax reporting.
Common Mistakes New Binance Users Make
Trading without understanding order types: A market order fills instantly at the current price. A limit order fills only at your specified price or even better. Limit orders are almost always the most preferable option. They offer you more control and will often qualify for the lower “maker” fee tier.
Leaving funds on the exchange long-term: Binance is secure, however the golden rule of crypto is: not your keys, not your coins. So for any amountof crypto you’re not actively trading, you should move it to a hardware wallet like a Ledger or Trezor. Self-custody is the real ownership.
Ignoring the Earn section: If your USDT is seated idle in your spot wallet, it earns you nothing. Binance Flexible Savings products allows you to earn yield while keeping your monies accessible. Even a modest APY is better than none.
Skipping the transaction history export: Every quarter, proceed to download your transaction history from the Orders section. Monitoring this in real time is infinitely easier than trying to assess six months of trades during tax season.
Frequently Asked Questions
- Can I register a Binance account without completing KYC? It’s possible to create a Binance account without KYC, however, your functionality will be critically limited; very low withdrawal limits, no access to most features, and no eligibility for welcome bonuses. For any tangible use of the platform, KYC is effectively mandatory.
- How long does the Binance registration process take? The registration process should take you about 3-5 minutes. KYC verification on the other hand takes 10 minutes to 24 hours. Nevertheless, in most cases, you’ll be fully set up and verified within the same day.
- Is it safe to upload my ID to Binance? Binance stores its KYC data under enterprise-grade encryption and is compliant with data protection regulations in all the jurisdictions it runs on. With that said, any time a user uploads personal documents online, it comes with an inherent risk. Binance’s track record on data security is quite solid, and KYC is inevitable on any regulated exchange. Ensure you use the official site and you’ll be fine.
- Can I have two Binance accounts? Binance’s terms of service prevents one individual from having multiple accounts. If its detected, both accounts will be suspended and the funds frozen. In case you created an account without a referral code and want to use BONUS369, opening a second account inherently violates terms it’s not worth the risk.
- What happens if I forget my Binance password? Make use of the “Forgot Password” option on the login page. You’ll be required to access the email or phone number linked to your Binance account. This is why using a real, active email address during registration is crucial. It’s how you can easily recover your account.
- What is the minimum deposit on Binance? For crypto deposits, there’s usually a minimum deposit amount that changes by asset. For fiat, it will be dependent on payment method and region. Check out the deposit page for your specific currency and payment method.
- Can I use Binance on my phone? Yes, absolutely. The Binance app is available on iOS and Android and is one of the best exchange mobile apps available to crypto users. Most of the features available on desktop are also accessible in the app, including full trading interfaces, earn products, and the Rewards Hub.
- What is SAFU on Binance? SAFU stands for “Secure Asset Fund for Users”. This is Binance’s emergency insurance fund. Binance distributes a portion of trading fees to this fund, which is used to cover Binance users in the event that a major security incident takes place. It’s Binance’s in-house equivalent of deposit insurance and adds an exceptional layer of protection to user funds.
- Does Binance support fiat currencies? Yes. Binance supports plenty of fiat currencies for deposits and withdrawals, depending on your location. EUR, GBP, AUD, BRL, and many more are supported via several payment channels including bank transfer, card, and other local payment methods.
Conclusion
Creating your Binance account the right way is one of the highest-leverage things you can do as a Binance user. Do it correctly. Secure email, strong password, referral code BONUS369 for the $600 bonus and 20% lifetime fee discount, strong 2FA, KYC completed on time; and you’ll have built a exceptional foundation that will serve you for years.
Understand that the crypto market rewards good preparation. The traders who understand their tools, reduce their costs, and protect their accounts are the ones still going strong bull cycle after bull cycle.
Go set up that account. The market’s waiting.
Last edited: 5/5/2026
Kraków-based trader active in crypto markets since the 2017 bull cycle. Andrzej specialises in on-chain analysis, exchange mechanics, and risk management. I help everyday crypto traders navigate the crypto space with confidence in order to make informed decisions.
Disclaimer: This article is for informational purposes only and does not constitute financial advice. Cryptocurrency trading involves significant risk. Always conduct your own research and verify current terms, fees, and bonus conditions directly on Binance’s official platform, as these are subject to change.